In this tutorial we are going to learn how to create a breaking apart effect using some simple, but effective, techniques in Photoshop.
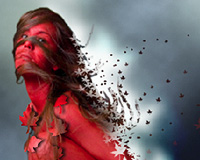
One of the greatest tools in Photoshop which is often overlooked is layer masks and when used correctly, they can blend images together seamlessly, giving that professional touch.
We are going to combine the masks with brushes to compliment the original source image with subtle elements.
Once you have completed this tutorial you can experiment with your own findings and combine the techniques used to create a unique and inspiring work.
Step 1
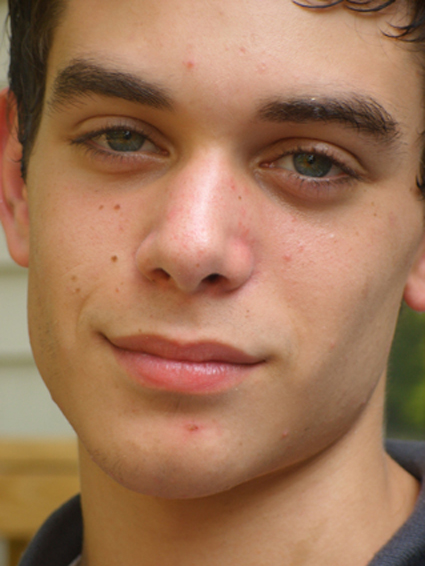
We begin the tutorial by extracting the model from the background. I’ve purchased a photo of a model from iStockphoto called
“Painted Dreams” (This image is used only for tutorial purposes and the copyright remains with the photographer). There are a number of ways to cut out a selection, but we are going to use the
pen tool to trace around the model.
Step 2
The best way to do this accurately is to zoom in at about 200 %. Once you have carefully completed the selection, right click on the layer and choose
rasterize it, then select it using the magic wand. With the selection active, click on the original layer, then cut and paste it into a new document measuring 1024 pixels width by 768 pixels length at 72 dpi.
This is going to be our new canvas. Reposition the model to the left of the document so that we have a nice composition as shown below
20 Feb

In this tutorial we are going to learn how to create a breaking apart effect using some simple, but effective, techniques in Photoshop.
One of the greatest tools in Photoshop which is often overlooked is layer masks and when used correctly, they can blend images together seamlessly, giving that professional touch.
We are going to combine the masks with brushes to compliment the original source image with subtle elements.
Once you have completed this tutorial you can experiment with your own findings and combine the techniques used to create a unique and inspiring work.
Step 1
We begin the tutorial by extracting the model from the background. I’ve purchased a photo of a model from iStockphoto called
“Painted Dreams” (This image is used only for tutorial purposes and the copyright remains with the photographer). There are a number of ways to cut out a selection, but we are going to use the
pen tool to trace around the model.

Step 2
The best way to do this accurately is to zoom in at about 200 %. Once you have carefully completed the selection, right click on the layer and choose
rasterize it, then select it using the magic wand. With the selection active, click on the original layer, then cut and paste it into a new document measuring 1024 pixels width by 768 pixels length at 72 dpi.
This is going to be our new canvas. Reposition the model to the left of the document so that we have a nice composition as shown below.

Step 3
Create a new layer, fill the foreground colour with a light blue colour (#8aa8c2) and then choose a dark blue for the background colour ( #090f1d ). Click on the swatches at the bottom of the Tools palette to input the colour references.
Now we are going to add
render clouds to the layer
Filter>Render>Clouds. You may need to repeat the render clouds, or even add
difference clouds to the layer, until you get a similar effect to the one shown in the screenshot below. Move this behind the model so that we now have a background layer as the basis for our illustration.
20 Feb
In this tutorial we are going to learn how to create a breaking apart effect using some simple, but effective, techniques in Photoshop.
One of the greatest tools in Photoshop which is often overlooked is layer masks and when used correctly, they can blend images together seamlessly, giving that professional touch.
We are going to combine the masks with brushes to compliment the original source image with subtle elements.
Once you have completed this tutorial you can experiment with your own findings and combine the techniques used to create a unique and inspiring work.
Step 1
We begin the tutorial by extracting the model from the background. I’ve purchased a photo of a model from iStockphoto called
“Painted Dreams” (This image is used only for tutorial purposes and the copyright remains with the photographer). There are a number of ways to cut out a selection, but we are going to use the
pen tool to trace around the model.
Step 2
The best way to do this accurately is to zoom in at about 200 %. Once you have carefully completed the selection, right click on the layer and choose
rasterize it, then select it using the magic wand. With the selection active, click on the original layer, then cut and paste it into a new document measuring 1024 pixels width by 768 pixels length at 72 dpi.
This is going to be our new canvas. Reposition the model to the left of the document so that we have a nice composition as shown below.
Step 3
Create a new layer, fill the foreground colour with a light blue colour (#8aa8c2) and then choose a dark blue for the background colour ( #090f1d ). Click on the swatches at the bottom of the Tools palette to input the colour references.
Now we are going to add
render clouds to the layer
Filter>Render>Clouds. You may need to repeat the render clouds, or even add
difference clouds to the layer, until you get a similar effect to the one shown in the screenshot below. Move this behind the model so that we now have a background layer as the basis for our illustration.

Step 4
Create a new layer and with the foreground colour set to a light greenish colour (#82947f), use a large soft brush set to 300px diameter and 100% opacity and spray three dots to the top left corner, setting the layer to
screen mode.
Once again create another layer, but this time use a
white soft brush set to 140px and spray three dots near the green ones, with the layer set in
overlay mode. Last, repeat this process with a 220 pixel dark blue soft brush (#090f1d) and gently spray from behind the model towards the right of the canvas. Set the layer to
overlay mode.
Step 5
Now it’s time to add some more brush effects. Let’s begin with a large soft white brush (the diameter is approximately 60 pixels) with a 100% opacity. Go ahead and make some random marks behind the right side of the model.
Then add a
Gaussian blur with the settings
Filter>Blur>Gaussian Blur>radius 8.9 pixels. Duplicate this layer and set to
overlay mode.
Step 6
Go back to the dark blue soft brush layer in
Step 4 and add a layer mask to it. Now it starts to get interesting!! Click on the brush tool and open the brush parameters. Scroll down through the default brushes until you find
“scattered maple leaf” (if you can’t find it, use a similar leaf).
Set the diameter between 30 pixels and 80 pixels and make some random strokes. With different size brushes, use a smaller brush so that you have smaller leaves closer to the model and have them gradually getting larger as they move further away to the right.
Remember to set the colour of the mask brush to black, so that the strokes will be clearly visible in the layer mask.
Step 7
Here is a screenshot of the parameters I used with
shape dynamics selected. At this time, you can add some jitter to the size and angle jittering (about 10%). Experiment with the values until you get the effect you’re looking for, adding scattering can also break up the regularity.
Step 8
Add a
gaussian blur of a 9.1 pixel radius to the layer mask. It is very important that you do not interfere with the actual layer and do this only on the mask. Set the layer mode to
overlay.
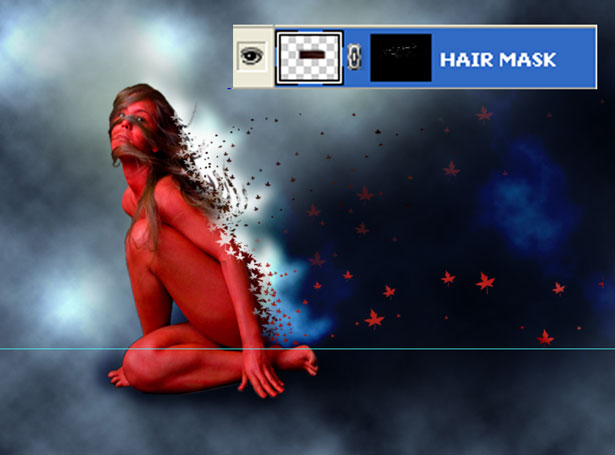
Step 9
To add more depth to the composition, we are going to give the impression that parts of the model’s body are breaking apart. Repeat the same technique described in step 6 by adding a layer mask to the red model layer and paint in the mask area using the same maple leaf brush. (Vary the brush sizes between 20 and 30 pixels).
Again, make random single strokes cutting away parts of the body and hair to the right of the model. It should look like the screenshot below.
20 Feb
In this tutorial we are going to learn how to create a breaking apart effect using some simple, but effective, techniques in Photoshop.
One of the greatest tools in Photoshop which is often overlooked is layer masks and when used correctly, they can blend images together seamlessly, giving that professional touch.
We are going to combine the masks with brushes to compliment the original source image with subtle elements.
Once you have completed this tutorial you can experiment with your own findings and combine the techniques used to create a unique and inspiring work.
Step 1
We begin the tutorial by extracting the model from the background. I’ve purchased a photo of a model from iStockphoto called
“Painted Dreams” (This image is used only for tutorial purposes and the copyright remains with the photographer). There are a number of ways to cut out a selection, but we are going to use the
pen tool to trace around the model.
Step 2
The best way to do this accurately is to zoom in at about 200 %. Once you have carefully completed the selection, right click on the layer and choose
rasterize it, then select it using the magic wand. With the selection active, click on the original layer, then cut and paste it into a new document measuring 1024 pixels width by 768 pixels length at 72 dpi.
This is going to be our new canvas. Reposition the model to the left of the document so that we have a nice composition as shown below.
Step 3
Create a new layer, fill the foreground colour with a light blue colour (#8aa8c2) and then choose a dark blue for the background colour ( #090f1d ). Click on the swatches at the bottom of the Tools palette to input the colour references.
Now we are going to add
render clouds to the layer
Filter>Render>Clouds. You may need to repeat the render clouds, or even add
difference clouds to the layer, until you get a similar effect to the one shown in the screenshot below. Move this behind the model so that we now have a background layer as the basis for our illustration.
Step 4
Create a new layer and with the foreground colour set to a light greenish colour (#82947f), use a large soft brush set to 300px diameter and 100% opacity and spray three dots to the top left corner, setting the layer to
screen mode.
Once again create another layer, but this time use a white soft brush set to 140px and spray three dots near the green ones, with the layer set in
overlay mode. Last, repeat this process with a 220 pixel dark blue soft brush (#090f1d) and gently spray from behind the model towards the right of the canvas. Set the layer to
overlay mode.

Step 5
Now it’s time to add some more brush effects. Let’s begin with a large soft white brush (the diameter is approximately 60 pixels) with a 100% opacity. Go ahead and make some random marks behind the right side of the model.
Then add a
Gaussian blur with the settings
Filter>Blur>Gaussian Blur>radius 8.9 pixels. Duplicate this layer and set to
overlay mode.

Step 6
Go back to the dark blue soft brush layer in
Step 4 and add a layer mask to it. Now it starts to get interesting!! Click on the brush tool and open the brush parameters. Scroll down through the default brushes until you find
“scattered maple leaf” (if you can’t find it, use a similar leaf).
Set the diameter between 30 pixels and 80 pixels and make some random strokes. With different size brushes, use a smaller brush so that you have smaller leaves closer to the model and have them gradually getting larger as they move further away to the right.
Remember to set the colour of the mask brush to black, so that the strokes will be clearly visible in the layer mask.

Step 7
Here is a screenshot of the parameters I used with
shape dynamics selected. At this time, you can add some jitter to the size and angle jittering (about 10%). Experiment with the values until you get the effect you’re looking for, adding scattering can also break up the regularity.

Step 8
Add a
gaussian blur of a 9.1 pixel radius to the layer mask. It is very important that you do not interfere with the actual layer and do this only on the mask. Set the layer mode to
overlay.

Step 9
To add more depth to the composition, we are going to give the impression that parts of the model’s body are breaking apart. Repeat the same technique described in step 6 by adding a layer mask to the red model layer and paint in the mask area using the same maple leaf brush. (Vary the brush sizes between 20 and 30 pixels).
Again, make random single strokes cutting away parts of the body and hair to the right of the model. It should look like the screenshot below.

Step 10
To make the composition a little more interesting, select a small area of skin from the body of the model. I’ve chosen the thigh area and cloned this using the rectangular marquee tool, then copy and paste it into a new layer.
Step 11
Using the transform tool
Edit>Transform>Scale, distort the new layer by stretching it until it looks similar to the screenshot below. This will require you to pull the vertices horizontally and vertically. Remember to cover the models body slightly as this will be important in the next step.
Step 12
We add another layer mask to the layer
Layer>Layer Mask>Hide All but this time we hide all. With the mask selected, use the same maple leaf brush as before and paint strokes varying the size as discussed in step 9 – remember to use a white brush colour.
Once completed, change the layer mode opacity to around 30%. Repeat this process again with a new layer, but leave the layer mode to 100%. See the screenshot showing the two different layers:
Step 13
Using the same principle in the previous step, we sample a portion of the hair of the model and copy and paste it into a new layer. Again we distort it using the scale transform tool stretching into a rectangular shape to cover a larger area.
Step 14
Add a Hide all layer mask and using a very small maple leaf brush make some random strokes so that it looks like small bits of hair are breaking apart from the model. Don’t forget to use a white brush in order to see anything in the mask area.
You may need to experiment a little with the brush size to get the exact effect. Another cool tip is to use a mid grey brush so that the furthest pieces seem more transparent.
Step 15
Using the
custom shape tool we go to the default shapes as shown in the screenshot below and we select “Leaf 7”. I have highlighted the shape in red, but if you can’t find it or don’t have it, select another leaf shape.
Step 16
Create the “leaf 7″ shape and resize it as shown in the screenshot below. Then, using the magic wand tool, go ahead and select the shape. With the selection now active, reposition it near the shoulder/neck area and hide the original shape layer.
Scroll down the layers until you find the original “red model” layer and copy and paste the selection into a new layer. Using the move tool, nudge it slightly to the left using the arrows on your keyboard.
Step 17
In order to give it a 3D effect, we’re going to add a layer style located at the top menu of the screen.
Layer>Layer Style>Drop Shadow.
With the blending options opened, check the
drop shadow option and use the settings shown in the screenshot below.
Blend mode>Multiply>Opacity 75%, Angle>175 degrees with global light selected,
Distance>5px, Spread>0 px, Size>5 px.
Quality>Noise>0% with the
“Layer knocks out drop shadow” option selected.
You can slightly tweak the settings until you’re satisfied with the results.
Step 18
Duplicate the layer nine times and distort each layer with the transform tool so that each one is different and reposition them as shown in the screenshot. I’ve resized them down between 70–90 % so that each one looks different. (If the image doesn’t quite look the same as the tutorial image, you may need to improvise a little).
Adding more layers will give the illustration extra depth and texture, so feel free to experiment with this effect.
Step 19
Create another custom shape as described in steps 15 and 16 using a different leaf shape. This time we’re going to use a large “Leaf 5” shape with a reddish brown colour (#a01205). Take a look at the screenshot to give you an idea of the size of the leaf – once selected,
rasterize the layer.
Step 20
Move the new leaf layer behind the
”red model” layer and use the transform tools to distort the shape of the leaf. We want to give the impression that the leaf is a shadow sitting on the floor so we use the
Transform>Distort tool at this time.
Step 21
We’re almost done! Now if you wish, you can add a texture to the leaf using a
Layer mask>Reveal all, painting random marks with the same leaf brush used throughout this tutorial. For finishing touches use a
gaussian blur set to 10 pixels radius with a multiply blend mode set to 100% opacity.
Step 22
To give it that fantasy feel, select all the layers and group them. Rename the group “final”, and duplicate it. With the duplicated group, select
Layer>Merge Group. Use a
gaussian blur with a radius of 15 pixels, change the blend mode to
screen and the opacity to 85%.
Written exclusively for WDD by Vince Fraser
Have you tried this tutorial on your images? Please share with everyone…


